SAP Router - Installation and Configuration in Linux and Windows
Step 1. Download newest version of SAPCAR, SAProuter xx.SAR and Cryptographic library from SAP Service marketplace https://support.sap.com/en/tools/connectivity-tools/saprouter.html
Step 2 . Create a sub-directory saprouter in the location
For Windows : <drive>:\usr\sap {i.e. E:\usr\sap\saprouter}
For Linux : /usr/sap {i.e. /usr/sap/saprouter}
and save all the SAR files (Downloaded in Step 1) in this directory.
Step 3 .
Extract all SAR files using the command
SAPCAR.EXE -xvf <path of SARfilexxx.sar>
Example
Now, you have all required files and binaries in /usr/sap/saprouter
Step 4.
Set the the environment variable :
Windows :
SECUDIR=drive:\usr\sap\saprouter
LD_LIBRARY_PATH=drive:\usr\sap\saprouter
SNC_LIB=drive:\usr\sap\saprouter\libsapcrypto.so
Linux :
SECUDIR=/usr/sap/saprouter
LD_LIBRARY_PATH=/usr/sap/saprouter
SNC_LIB=/usr/sap/saprouter/libsapcrypto.so
Step 5.
Go through this link https://support.sap.com/en/tools/connectivity-tools/saprouter.html
to Generate the SAProuter certificate.
Click on Apply Now Icon as shown in below mentioned figure.
Step : 6 Generate certificate request at OS level using the command sapgenpse
-> sapgenpse get_pse -v -r certreq -p local.pse "your DN"
Example Command :
sapgenpse get_pse -v -r certreq -p local.pse "CN=hostname, OU=0000123456, OU=SAProuter, O=SAP, C=DE"
It will ask for a PIN enter the PIN and then press Enter.
Sample Output of Previous Command:
Got absolute PSE path "/usr/sap/saprouter/local.pse".
Please enter PSE PIN/Passphrase: ****
Please reenter PSE PIN/Passphrase: ****
!!! WARNING: For security reasons it is recommended to use a PIN/passphrase
!!! WARNING: which is at least 8 characters long and contains characters in
!!! WARNING: upper and lower case, numbers and non-alphanumeric symbols.
Supplied distinguished name: "CN=hostname, OU=000123456, OU=SAProuter, O=SAP, C=DE"
Creating PSE with format v2 (default)
succeeded.
certificate creation... ok
PSE update... ok
PKRoot... ok
Generating certificate request... ok.
Certificate Request:
Signed Part:
Subject: CN=hostname, OU=000123456, OU=SAProuter, O=SAP, C=DE
Key: rsaEncryption (2048 bits)
Attributes: None
Signature:
Signature algorithm: sha256WithRsaEncryption (1.2.840.113549.1.1.11)
Signature: <Not displayed>
As an Output this command creates certreq file .
Open the certreq file in any text editor. Now copy the content of this file and paste into the text box below the heading Insert the Certificate Signing Request . You will get that window after Click on Apply now as mentioned in above picture.
Step 5 (Refer below mentioned figure)
You will get the certificate on the next screen in similar text field but the text
will look like
-----BEGIN CERTIFICATE-----
MIIIdAYJKoZIhvcNAQcCoIIIZTCCCGECAQExADALBgkqhkiG9w0BBwGggghJMIIDB
.
.
.
.
.
cGl17YC0GOnY8Ms3Hh6SWCdKLjmmsNg1Ya9k7ZeQE2bu08MACw7LD0pmp1sYfSXst
vMHJzvtpEZnH8RkYCvmyGbAKTbNuMQA=
-----END CERTIFICATE-----
This is your new certificate save as the whole content into file named as srcert
Step 7 : Import the certificate
Run the following command to import the certificate
->sapgenpse import_own_cert -c srcert -p local.pse
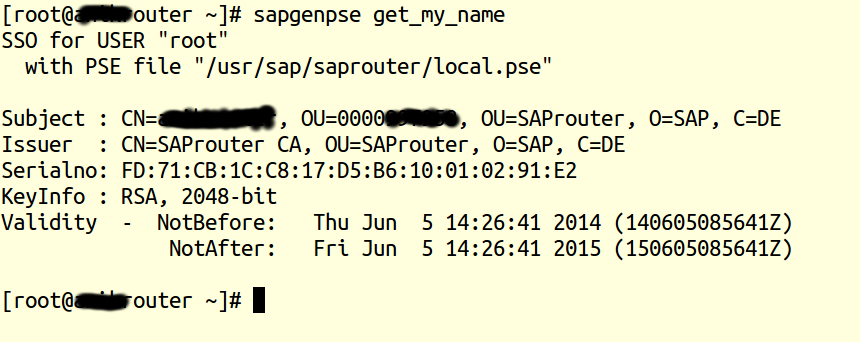
Run the following command to get the information such as Issuer, S.no, Validity etc
-> sapgenpse get_my_name
Step 8 : Need to create the user credential for who will administer the sap router
->sapgenpse seclogin -p local.pse -O saprouter
This will create the file cred_v2
Step 9: Start and Stop of Sap Router
Command to start the SAProuter :
-> saprouter -r -G routerlog -S 3299 -K "p:CN=hostname, OU=0000123456, OU=SAProuter, O=SAP, C=DE"
Command to start the SAProuter :
-> saprouter -s


No comments:
Post a Comment